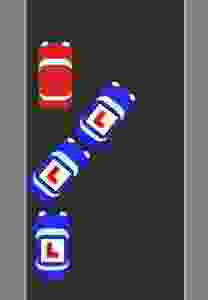
What is an angled start?
An angled start is moving off from behind an object – usually a car.

Why do we have to do them?
The examiners on your driving test will require you to do an angled start – this is to ensure that you can move off safely from behind a parked vehicle or obstacle, ensuring that you are checking your mirrors and blind spots appropriately, signalling appropriately, and moving off smoothly whilst being in control of your vehicle. It will happen in every day life – which is why we teach you these important skills.
What other ‘starts’ are there?
Other ‘starts’ that your examiner will be looking for are normal starts – which is moving off from the side of the road, and moving off on a gradient. The examiner is again checking that you can move off smoothly from the side of the road, whilst being safe, in control, and aware of what’s going on around you. The same with moving off on a gradient – checking that you’re able to move off safely whilst in control on a hill/slope.
What is the examiner looking for?
This is the official examiners guidance – The examiner should observe whether the candidate first sees to the front, then to the rear, that the way is clear for pulling out, gives the appropriate signal if necessary, and moves away smoothly and safely. Wherever possible, ability to move off on a reasonably steep uphill gradient should be tested. A candidate starting on a gradient should be capable of paying attention to other traffic as well as moving their vehicle away without rollback and/ or excessive engine revolutions. If stopping on a hill is not possible an additional ‘normal’ stop need not be sought. However, the test must always include moving off at an angle from behind a stationary vehicle.
How do I move off safely?
The Driving Essential Skills book – our ‘bible’ for driving – says the following (I have simplified it a little to make it easier to read):
– Press the clutch pedal fully down and hold it there
– Select 1st gear
– Press the accelerator slightly and hold it steady
– Slowly and smoothly bring the clutch pedal up, until you hear the engine noise change slightly. This is the biting point.
– Hold the clutch steady in this position
– Make your final safety checks, use your mirrors and look over your right shoulder to check your blind spot
– Decide if a signal is necessary. The timing of your signal is crucial. Avoid waiting for too long with the clutch at bite point
– If it’s safe to move off, be ready to release the parking brake (also known as the hand brake)
– Look around again if necessary and keep an eye on your mirrors
– When you’re sure it’s safe and convenient to move off, release the parking brake, and let the clutch pedal come up a little more
– The vehicle will begin to move
– Gradually press your accelerator for more speed, and let the clutch come up smoothly, then take your foot off the clutch pedal
On your driving lessons, your driving instructor will help you perfect this important skill!
Where can you NOT stop/park?
Let’s be honest… if you start moving off, you’ll have to stop again at some point!
So where is it not safe to stop/park?
Double yellow lines
Single yellow lines – look at the waiting restrictions
Double white lines – including broken white lines
Blocking driveways – (occasionally an examiner may say you can block a driveway temporarily whilst you pull up, as you will not be there for long and you aren’t actually parking)
Blocking dropped kerbs – wheelchair access etc.
On pavements
Bus stops / Bus lanes / opposite bus stops
Opposite other cars/road works/obstructions
Anywhere that would cause an obstruction
Cycle lanes
Bends/corners
Brow of a hill
Junctions – within 10 metres
Pedestrian crossings, including on the zig zag lines
School ‘keep clear’ zig zag lines
Keep clear boxes
Anywhere that would prevent emergency vehicle access
Taxi ranks – as indicated by signs
Clearways / Red routes
Spaces reserved for specific people – disabled, doctors, residents etc.
We hope this helps!
