Posted on

J is for Junctions

What is a junction?

A junction could be considered many types of things – including;

  • a T junction
  • a Y junction
  • a junction on a bend
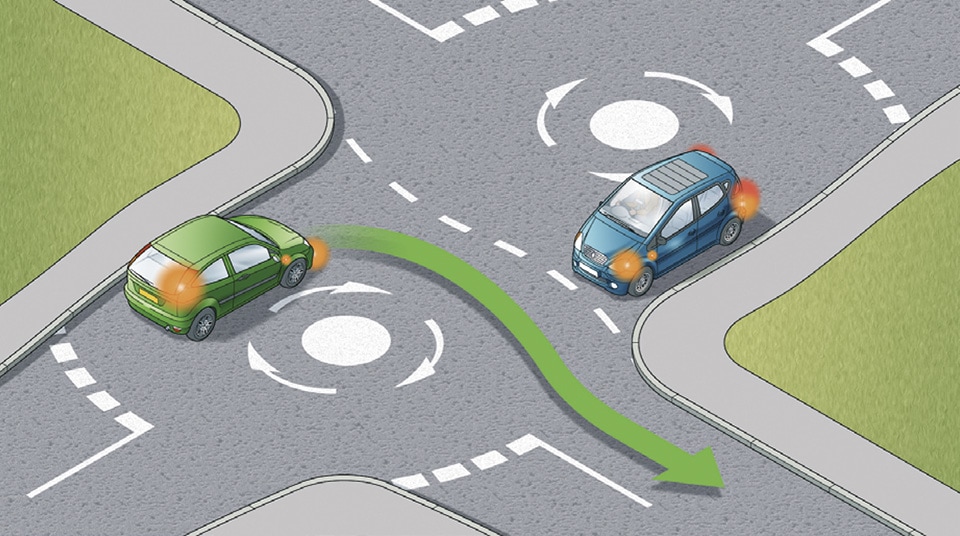
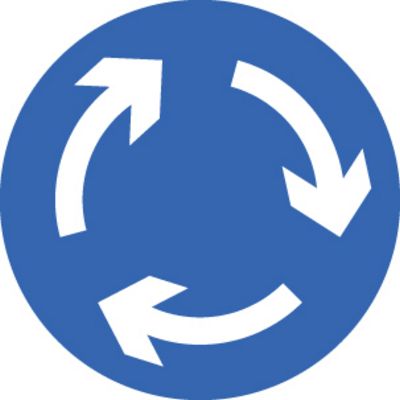
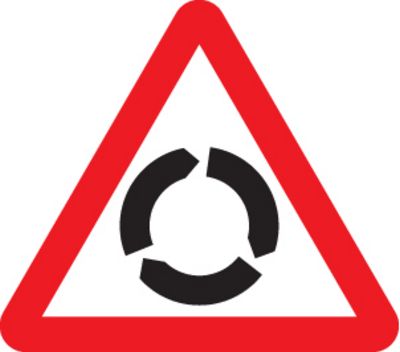
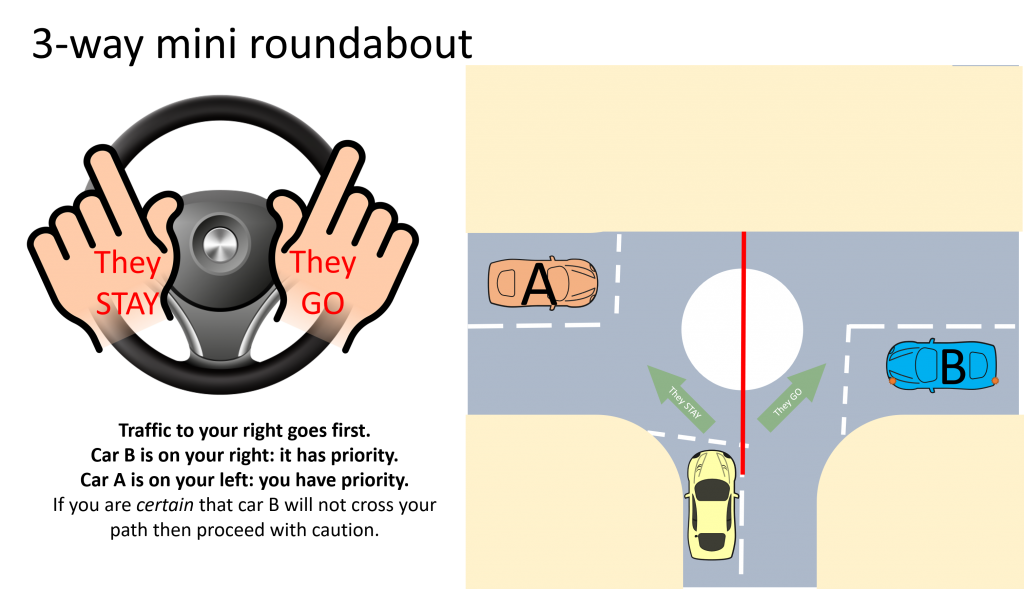
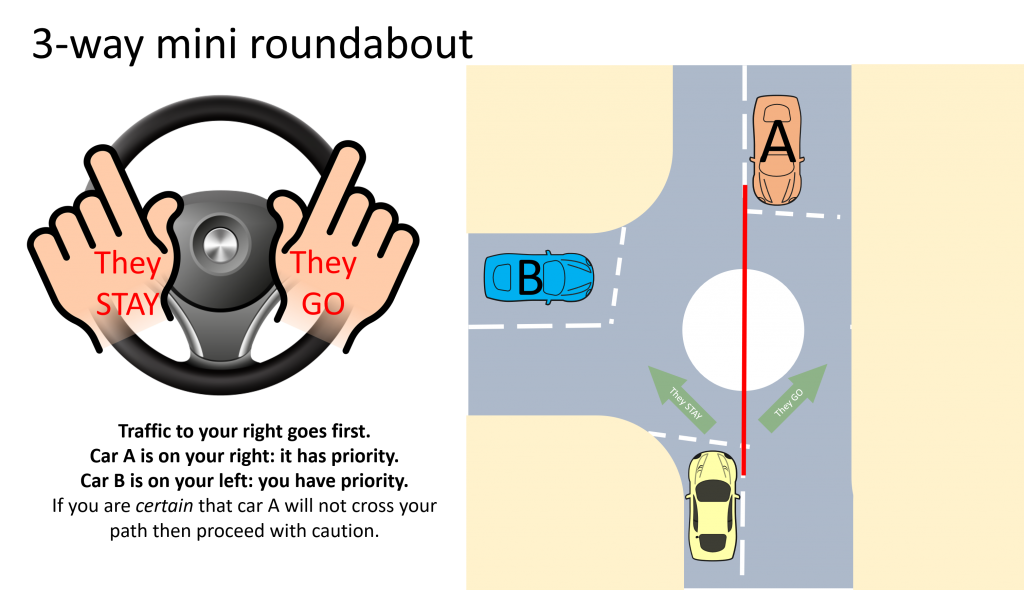
  • a roundabout
  • cross roads
  • unmarked junctions
  • controlled junctions
  • box junctions

T junction

T junctions are your typical junctions that we commonly come across, usually where we have to give way to other vehicles if we’re emerging from the junction.

Junction on a bend

Junctions on bends can be a little tricky – we have to be aware that we may not be able to see clearly around the corner, and take extra caution. Look for road markings and road signs to indicate who has priority.
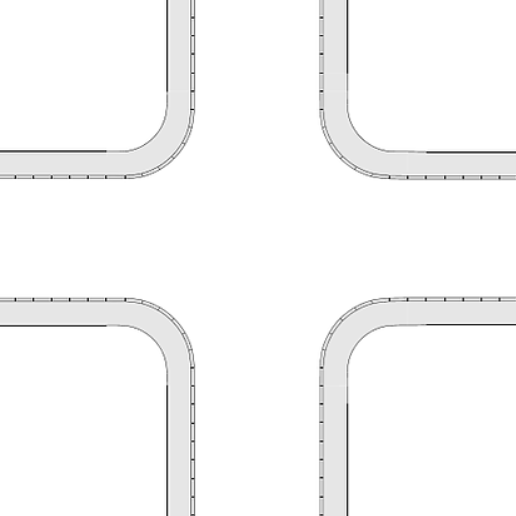
Cross roads

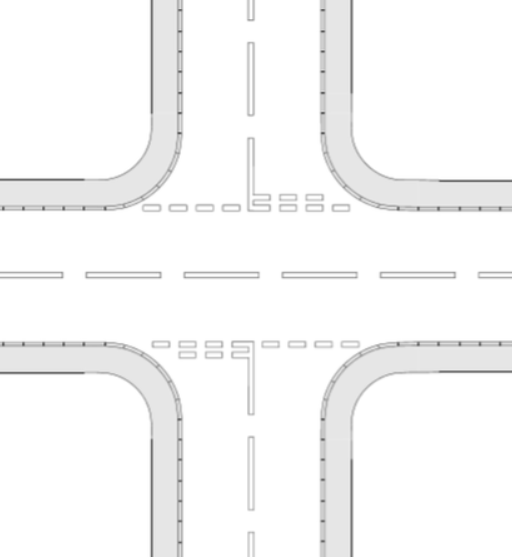
Cross roads can vary from cross road to cross road. Some cross roads have markings, making it clear who has priority. Some cross roads have traffic lights, making them controlled junctions. Some cross roads don’t have any markings, making them unmarked junctions. Some cross roads have a yellow box in the middle, making them a box junction…

Rule 181 of the Highway Code also says this about turning right at cross roads –

When turning right at crossroads where an oncoming vehicle is also turning right, there is a choice of two methods;

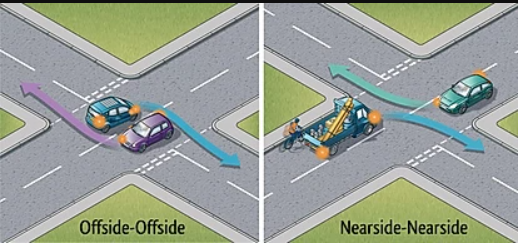
  • Right side to right side (offside-offside); keep the other vehicle on your right and turn behind it. This is generally the safer method as you have a clear view of any approaching traffic when completing your turn
  • Left side to left side (nearside-nearside), turning in front of each other. This can block your view of oncoming vehicles, so take extra care. Cyclists and motorcyclists in particular may be hidden from your view. Road layout, markings or how the other vehicle is positioned can determine which course should be taken.

Controlled junctions (above), are often found in busier areas, and traffic lights are used to keep traffic flowing. There may also be more than one lane (therefore the left hand lane may go left and road ahead, and the right hand lane turns right only). Controlled junctions may also feature a ‘filter light’ which indicates that you have priority. A normal ‘green’ light means you can proceed if it is safe to do so – so you must priority to oncoming traffic if you’re turning right. If we’re at a ‘normal’ cross roads, the main road usually has priority – look for signs and road markings to confirm this.

Unmarked junction

Unmarked junctions can be interesting! Technically, no-one has priority, so it’s essential that you slow down, be aware, make eye contact with other road users, and be sure of their intentions before turning. We may also look at the other road user’s positioning and speed to help us figure out where they’re intending to go.

It’s important to realise that drivers coming from other directions may think they have priority because of the shape of the road. They are wrong! But be safe and anticipate their mistake!

Box Junctions

Box junctions are yellow hatched markings in the middle of the junction. Rule 174 of the Highway Code says – You MUST NOT enter the box until your exit road or lane is clear. However, you may enter the box and wait when you want to turn right, and are only stopped from doing so by oncoming traffic, or by other vehicles waiting to turn right. At signalled roundabouts you MUST NOT enter the box unless you can cross over it completely without stopping.

Road markings & road signs

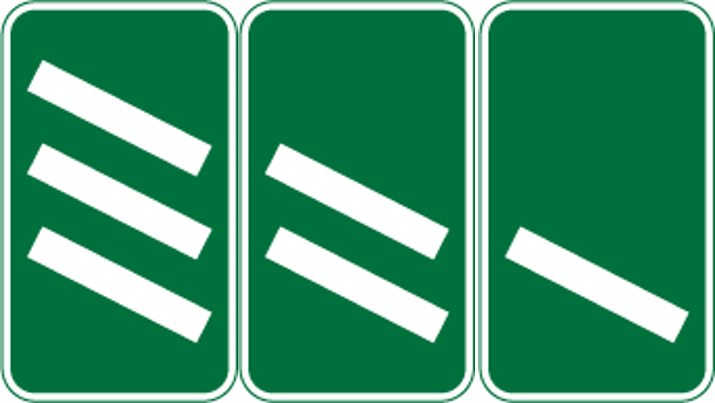
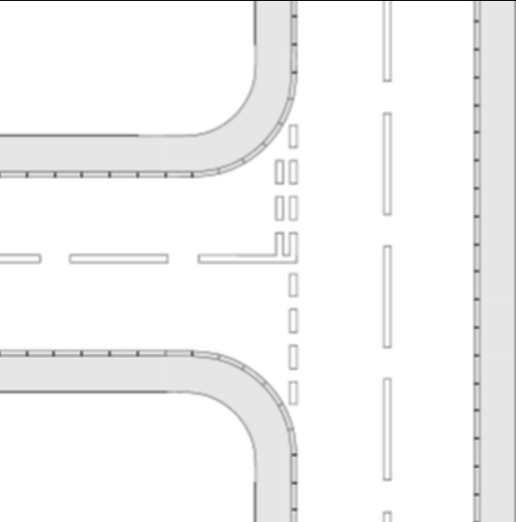
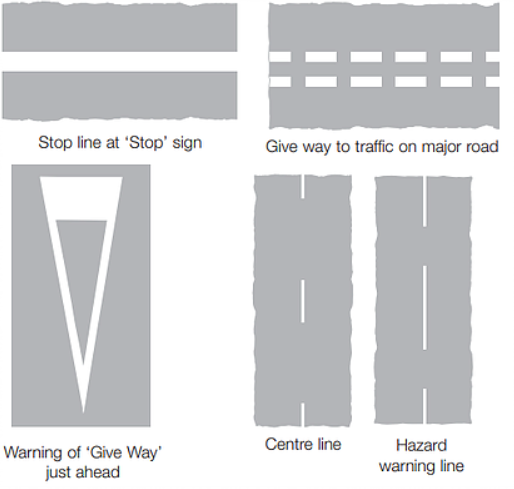
The most common road markings surrounding a typical junction would be a give way line, or a stop line. The centre line may also change to a hazard line. This is where the centre line becomes longer, and warns you of a hazard ahead, such as a junction, slip road, roundabout, sharp corner, etc. Have a look at the pictures and see the difference between a normal centre line, and a hazard line.

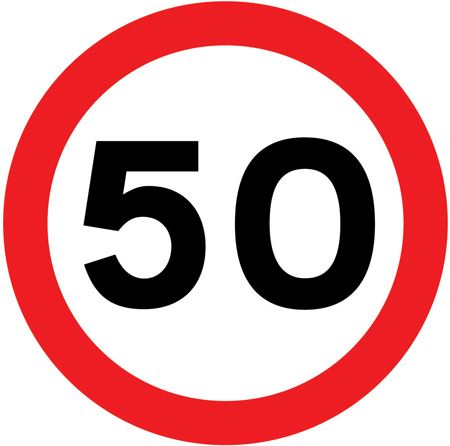
You may also find different signs surrounding junctions. These could be give way signs, STOP signs, warning signs (warning you of the type of junction coming up) etc. Have a look at some of the examples pictured here. Some signs have a ‘thicker’ line – this indicates the main road and therefore who has priority.

Can you identify these roadsigns?

Road signs & markings help us identify a junction. We may also look for gaps in houses, gaps in rows of parked cars, and other cars pulling in/out of the junction.

How do we deal with a typical junction?

Closed/blind junctions

A closed/blind junction means we’re unable to see clearly what is on the main road that we’re trying to emerge onto. It could be that the angle of the junction makes it difficult to see, or that houses, trees, or other ‘street furniture’ is getting in our way. This may mean we have to take extra precautions and creep out carefully at the junction, to get the best view of the road before emerging fully onto the main road.

Open junctions

Where a junction is open – meaning we can see clearly what is coming both ways as we approach the junction – we may not have to stop (unless there is a STOP sign). We could look nice and early, plan ahead, bring our speed down, choose an appropriate gear, and drive out of the junction safely.

MSPSL

Many instructors use MSPSL to help students understand what we need to do on the approach to a junction, and how to deal with junctions safely. The MSPSL routine works for approaching any junction, roundabout or hazard. It’s a good routine to remember, but it’s important to understand why we’re doing each step, and why it’s important.

Mirrors

We would check our middle mirror to tell us what’s behind us. Our middle mirror gives us a ‘true’ picture of what is behind us. Our side mirrors are slightly curved (convex), therefore gives us a wider view, however makes everything look further away – so we need to take that into account when making decisions as to when to pull out, overtake, turn, etc.

It’s also important to think about what you’re going to do if, for example, a car is following you closely, or there is a car next to you when you’re trying to change lanes.

As you progress in your driving, you will learn the skills of anticipation and judgement – they take time and experience, and your instructor can support you with this.

Signal

Typically we would indicate left or right. Sometimes if we’re going road ahead, we may not indicate. It’s important that our signals don’t confuse other road users – and this is why it’s important that we check our mirrors first, to see who’s around. Imagine if we were on a dual carriageway and wanted to overtake, so we signalled first, checked our mirrors, and realised a car was next to us? How do you think that car would feel? Do you think they’d be surprised? What action do you think they’d take if they saw a car suddenly signalling to change lanes?

It’s also important to understand what a signal actually is – it could be a number of things. A signal is something that shows others our intentions, here are a few examples;

Indicators – shows where we’re going

Road positioning – shows where we’re going

Brake lights – shows we’re slowing down

Reverse lights – shows we’re reversing

Headlights – warns road users of our presence

Speed – indicates whether we’re likely to turn into a junction (for example, if we see a car approaching really fast with it’s indicator on, it’s unlikely they’re actually going to turn, so we should be cautious of trusting an indicator alone)

Position

Our position can tell other road users a lot about where we’re going. If there is more than one lane, we can choose the correct lane, appropriate for where we’re going. We can use road markings and arrows on the road to help us, and also by looking at road signs which may show which lane to choose for different directions.

Even if there is only one lane, our positioning can still be a powerful signal. If we ‘hug’ the kerb to the left and follow that kerb round, it would show other road users that we are going to turn left. If we stay to the right hand side of our lane, it would show other road users that we are going to turn right.

Speed

Speed is important – firstly, it can be a signal to other road users as to where we’re going or what we’re planning to do, but having our speed under control will really help us control the car when we’re making a turn at a junction or roundabout etc. Bringing our speed down not only gives us more control over the car, but also allows us to plan ahead better, and gives us more time to deal with the junction and our surroundings.

Speed and gears are also closely linked together – if we bring our speed down, but fail to change down a gear, we still wouldn’t have as much control over the car. So it’s important to bring our speed down to a suitable speed for the turn that we’re making, and then choose an appropriate gear for the speed that we’re doing.

How much we bring our speed down would depend on a number of factors, including how wide or narrow the turn is, how many lanes there are, how sharp the turn is, whether it’s a blind/closed junction, whether it’s a give way or stop line, other traffic, road conditions, weather conditions, and even your own skill and ability etc.

Being able to decide what speed and gear to use for different junctions again comes with experience – your instructor can support you with this.

Look

Last but not least, it’s important to look!

We need to look out of the junction if we’re emerging, to make sure it’s safe to turn – this would include looking left and right at a typical T junction for example. Even if we were turning left, it’s still important to check to the left – what if there was a vehicle overtaking another vehicle, and was in your lane on the main road?

If we were turning into a junction, it would still be important to look around – if you’re turning right we need to ensure there are no oncoming vehicles who we need to give priority to, and whenever we turn into a junction it’s important to check the road is clear first! Imagine if there was a pedestrian walking across the new road, or there was a queue of traffic in the new road?

It’s important to take in your surroundings, look out for hazards, plan ahead, have good car control, have good judgement, and good decision making skills.

Posted on

G is for Gears

Wow… what a confusing and HUGE topic to cover! I won’t be able to do it justice in this one blog, so please do talk to your driving instructor if you want more information, or contact us at DKM Driving if you want to talk further about this.

What are gears?

The gearbox contains the gears, which control the relationship between the engine speed and wheel speed.

First gear provides the greatest force for the driving wheels and is normally the one you use to get the vehicle moving. As you speed up, you change up to the higher gears, each one giving you less engine power, but more speed for your wheels. Using the highest gear possible for speed and road traffic conditions saves fuel – as long as your speed isn’t too low for that gear.

When you’re pushing on your gas pedal, you make your engine go faster/work harder, which puts pressure on our engine. This is when we hear that ‘screaming’ noise, and we need to change up a gear. When we change up a gear, our engine now doesn’t have to work as hard to maintain its speed.

Which gear?

Most vehicles have 5 gears, some have 6 gears, and all have a reverse gear. When neutral is selected, no gear is engaged – this is known as coasting.

We start by moving off in 1st gear as this gear gives us the most power/force. As we build up our speed, we listen to our engine. When our engine starts ‘screaming’ at us, we change up a gear. We then work our way up through the gears. It’s perfectly ok to ‘skip’ a gear if we have built up enough speed. For example, you could be in 3rd gear building your speed up on a dual carriageway, and then be doing around 55-60mph in 3rd gear, and it would be perfectly ok to go straight from 3rd to 5th gear. Skipping gears at the appropriate time will give you more time to concentrate on the road ahead and allow you to keep both hands on the steering wheel for longer.

As you become more confident and experienced, you’ll be able to judge which gear you need for the speed you’re doing and the situation you are in, or are approaching.

It’s also important to know where each gear is. All vehicle’s gears are in the same place, however sometimes reverse gear can be in a different place, or if the car has 6 gears, then this would also change the position slightly. You can see some variations in the pictures below.

Changing gears

You can practise getting to know the position of the gears with the engine switched off – if the engine is switched off, nothing will happen and you’re not driving – so if you do want to look at the gear stick to become familiar with the different positions, then this is ok. If you are looking down at the gear stick whilst driving, where are you not looking? At the road!

If you feel resistance when changing gear, don’t force the gear stick. Don’t rush gear changes, and make sure you return your hand back to the steering wheel once you’ve changed gear, so that you have full control over the vehicle.

When to change up

You need to change gear in order to match the engine speed to the speed of the vehicle. This will vary with the vehicle that you’re driving, whether you’re driving on a flat level, uphill, or downhill. As a general rule, you should change up a gear as your road speed increases, and you hear the engine working harder. You’ll become more familiar with when to change up gear as you become more experienced and get more practise.

To change up gear;

– Place your left hand upon the gear stick

– Press the clutch pedal down, at the same time as you ease off your gas pedal

– Select the next highest gear required and which is suited to the road and traffic conditions

– Let the clutch pedal come up smoothly, and at the same time press the gas pedal back down gently. (I relate to this as a see-saw! As the clutch pedal comes up, the gas pedal goes down at the same time)

– Put your left hand back on the steering wheel

When to change down

You’ll need to change to a lower gear;

– If you’ve slowed down and the gear you’re in doesn’t provide enough power for driving at the lower speed

– If you’re going uphill in a high gear and your engine struggles to give your vehicle enough power

– To increase the effect of engine braking – for example, when driving downhill

To change down a gear as you are slowing down;

– You will already be braking as required for the junction/roundabout/hazard/situation ahead. We should brake to the desired speed for the gear we want to select

– Place your left hand on the gear stick

– Press the clutch pedal down, keeping your foot on your foot brake

– Select the most appropriate gear for the lower speed that you are doing. Being able to judge which gear is the most appropriate comes with practise, experience and good judgement

– Bring the clutch pedal up smoothly, continuing to brake if still appropriate

– Put your left hand back on the steering wheel

You are able to stop in any gear if you know you are coming to a complete stop. However, remember to be in the correct gear when you move off again.

To stop;

– Put light pressure on the brake at first

– Gradually increase the braking pressure as required

– When the car starts showing signs of struggling, push the clutch in, leaving it in the gear you’re already in. Because the clutch is pushed in, there is no connection between the engine and the wheels, therefore the gear you’re in is irrelevant in this situation

– Carry on braking as required to stop the vehicle

– When the vehicle has almost stopped, ease off the pressure so that the vehicle stops smoothly

Coasting

Coasting is where we have the vehicle in neutral, or have the clutch down unnecessarily whilst driving (such as turning into a junction, driving down a road, going round a roundabout). Coasting means that although the vehicle is still moving, it’s not being driven by the engine.

Coasting for any distance is wrong, because;

– It reduces the driver’s control of the vehicle

– You might have difficulty engaging a gear if something unexpected happens

– It almost certainly leads to the vehicle gathering speed when travelling downhill, resulting in it being harder to brake, and removes the assistance of engine braking which you would get in a lower gear

Each time you change gear you coast a little bit – this is unavoidable, but as long as you bring your clutch back up as soon as you’ve changed gear, this isn’t a problem. Also when you come to a stop, the clutch must go down to disengage the engine and the wheels, to prevent you from stalling.

Automatic gears

Some cars are ‘automatic’, in the simplest of terms – this means ‘we’ don’t have to change gear! Automatic vehicles have no clutch pedal. The engine decides when the vehicle is struggling or working too hard, and changes up and down gears automatically for the driver. This can make the physical job of driving easier, and give you more time to concentrate on the road ahead.

The ‘gears’ in an automatic vehicle are often;

P – Park – mechanically locks the gearbox inside the engine, and should only be used when the vehicle is stationary

N – Neutral – is the same as ‘neutral’ in a manual gearbox

D – Drive – is for driving forwards

R – Reverse – is for reversing backwards

Some automatic vehicles are ‘semi automatic’ – meaning you can change up and down the gears yourself, however the engine still does the physical work of changing gear, as you don’t have a clutch. This might be useful to use if you want the vehicle to stay in a lower gear whilst you are building up speed, or if you want your vehicle to stay in a lower gear whilst you are driving downhill, for example. Also if the road conditions are icy, it’s best to drive in a higher gear – therefore you can ‘manually’ select a higher gear in an automatic car.

Posted on

S is for spotty car

It’s the time of year when Driving Instructors all over the country work together to raise money for Children in Need. There are two main ways that we do this:

  1. Going Spotty. Next time you see me, my car will be covered in spots. Please consider sponsoring a spot. You choose how much to donate; no amount is too small (or too big), and then you are granted use of the Sharpie Pen to decorate your spot.

2. The Big Learner Relay. This is a 3,000 mile journey around the UK, driven entirely by learners. With several stages each day, each leg has a new lead car and the chosen learner heads up the convoy. It’s a big resposnibility as Pudsey Bear comes along for a ride on top of the car, clinging on to the L-plate roof-box.

I need a learner to help me, as I have the honour of leading the procession out of Wolverhampton with my student driving across Cannock Chase to Shugborough Hall. It’s going to be names in a hat as I can only take one lucky learner … but if you would like to be considered for it then let me know! The date is 4th November 2019

Since 2014 the Big Learner Relay has raised over £400,000. Can this year take it over half a million?

Posted on

F is for Following Distance

What is your following distance?

This is also known as a ‘separation distance’. It refers to the gap that we leave between our vehicle and the vehicle in front.

It’s important that we leave a good gap in case anything suddenly happens in front – it gives us time to react and slow or stop safely. Road traffic collisions are often caused by vehicles following the vehicle in front too closely.

It’s essential that drivers are able to judge a good separation distance in all types of conditions – whether it’s bad weather, heavy road traffic, different road conditions etc.

Slow-moving traffic

Sometimes in heavy, slow-moving traffic, it may not be realistic to leave a large separation distance. This could waste valuable road space especially in queues, and as you’re moving slowly, you will be able to stop quicker anyway. Even so, your separation distance should never be less than your thinking distance.

Rule 151 of the Highway Code says

In slow-moving traffic. You should:

  • Reduce the distance between you and the vehicle ahead to maintain traffic flow
  • Never get so close to the vehicle in front that you cannot stop safely
  • Leave enough space to be able to manoeuvre if the vehicle in front breaks down or an emergency vehicle needs to get past
  • Not change lanes to the left to overtake
  • Allow access into and from side roads, as blocking these will add to congestion
  • Be aware of cyclists and motorcyclists who may be passing on either side

Stopping distances

Last week in our ‘Emergency stop’ blog we looked at stopping distances, which is also relevant to our following distances. Your overall stopping distance is made up of your thinking distance and braking distance.

Thinking distance – is the time it takes you to think and react to the incident. If you’re feeling tired or unwell, it may take longer for you to process and react.
Braking distance – is the time it takes from when you start applying the brakes, to when you actually stop.
You need to leave enough space between you and the vehicle in front so that you can slow down or stop safely if the vehicle in front suddenly brakes.

Stopping distances can depend on a variety of things, including

  • How fast you’re going
  • Whether you’re travelling uphill or downhill
  • The weather
  • The conditions of the road
  • The type and age of your vehicle
  • The condition of your brakes and tyres
  • The size and weight of your vehicle
  • Your ability as a driver, and your reaction times

Judging a safe separation distance

A good way to judge a safe separation gap is to use the ‘two-second rule’. This is measured by counting two seconds from when the vehicle in front passes a stationary object, to when you pass the same stationary object.

If you are still counting to two when you pass the stationary object, this means you are too close to the vehicle in front and you need to drop back to give yourself a safer separation distance. If you have finished counting to two by the time you pass the stationary object, this means you have a good, safe separation gap. You may find it easier to use shadows on the road as the stationary object.

Sometimes it can be difficult to count to two properly! This may sound silly, but some people may count to two quickly and some may count slower. A good way to get around this is to use the phrase ‘Only a fool breaks the two-second rule’ – this takes approximately two seconds to say!

If the road conditions are wet, you should double the two-second rule, making it four seconds. One phrase for this is ‘Only a fool breaks the two-second rule. When it’s wet on the floor, then make it four!’. (Personally I just say the two-second rule twice). Also, remember spray from the vehicle in front may make visibility even worse – consider leaving an even bigger gap so that you can see clearly ahead.

When the conditions are icy or snowy, you should times the two-second rule by ten, making it 20 seconds! We haven’t yet come up with a catchy phrase for this – so brownie points if you can find a good phrase that takes 20 seconds to say! 😊


What can I do if a vehicle is following too closely behind me?

When a vehicle is following you too closely (sometimes called “tailgating” or “being a space-invader”), gently ease off your accelerator and gradually increase the gap between you and the vehicle in front. If you have a bigger gap between you and the vehicle in front, should anything happen, you will have even more time to react and can brake more gradually, which will give the vehicle behind time to react too.

Pay it forward: If the vehicle behind steals your space, give it to the car infront.

Chevrons

Some motorways may have special chevron markings in the centre of the traffic lanes, spaced 40 metres apart. Keeping two chevrons between your vehicle and the one in front will provide a safe separation distance at 70mph. There will be signs advising you to check your distance.


Overtaking

Remember to keep your distance from the vehicle that you’re trying to overtake. This will give you a better view of the road ahead – especially if you’re trying to overtake a lorry. Also, remember that large vehicles and motorcycles need a greater distance to stop, so consider leaving extra distance between yourself and them.

Posted on

E is for Emergency Stop

The emergency stop, also known as the controlled stop, is often practised during driving lessons. This involves simulating an emergency situation and getting the student to stop as quickly and as safely as possible. It could be that a pedestrian has suddenly walked out on you, or a car has pulled out on you.

How is it performed on a test?

Your examiner will pull you over at the side of the road and explain what they are going to do. They won’t just suddenly shout STOP whilst you’re driving along and expect you to stop!

  • They will choose a safe, quiet road for you to do this on, although the speed limit could be anything.
  • They will explain that they would like you to do an emergency stop and that the signal they give will be by raising their right hand and saying ‘STOP’
  • They will ask you to drive on when you’re ready. The examiner will look around, and then give you the STOP signal
  • You will be expected to react quickly and safely
  • Once you’ve stopped the examiner will ask you to drive on again, and you will not be asked to do the emergency stop again

1 in 3 tests does the emergency stop – so it’s not a definite that you’ll get the emergency stop on your test. However, it is good to practise this with your instructor so that you are prepared – and in case it happens for real one day!

The official DVSA examiners guidelines state the following;

An emergency stop should be carried out on one-third of tests chosen at random. It can normally be carried out at any time during the test, but the emergency stop exercise MUST be carried out safely where road and traffic conditions are suitable. If an emergency has already arisen naturally during the test this special exercise is not required. The examiner should explain to the candidate that they will be looking over their shoulder to make sure it is safe to carry out the exercise and that they should not pre-empt the signal by suddenly stopping when the examiner looks round but should wait for the proper signal to be given.

How do I do an emergency stop?

In an emergency, brake immediately. Try to avoid braking so harshly that you lock your wheels. Locked wheels can lead to loss of control.

(Highway Code)
  • Firstly, it’s important to note that you do not need to check your mirrors in an emergency stop. Looking in your mirror will waste valuable time when you should be braking
  • When you are given the STOP signal (or when the poor child runs out in front of you), you must react quickly and brake firmly, keeping two hands on the steering wheel
  • Once you’ve come to a complete stop, ensure you do not allow the car to roll (maybe apply your handbrake, and select neutral)
  • If you are on your driving test, the examiner will ask you to drive on when you’re ready
  • Remember to move off safely – including checking all around you – blind spots and mirrors, etc.

Driving the Essential Skills says the following;

  • Always keep both hands on the steering wheel. You need as much control as possible
  • Avoid braking so hard that you lock any of the wheels. A skid may cause a serious loss of control
  • Don’t press down on the clutch pedal until just before you stop. This helps with your braking and stability
  • Don’t use the parking brake while the vehicle is moving. Most parking brakes work on the back wheels only. Extra braking on the back wheels can cause skidding
  • Don’t give a signal – you need both hands to control your steering (and your brake lights will come on at the rear to signal to people behind that you are braking anyway)
  • Don’t make a special point of looking in the mirror – if you’ve been using your mirrors regularly you should know what’s behind you
  • Stop as quickly and as safely as possible, keeping your vehicle under full control
  • Look all around again before moving off

You can try and avoid the risk of needing to brake in an emergency. If you are planning well ahead, you will be aware of what’s going on around you. Look out for children playing, pedestrians, be aware of school times, and telltale signs such as a ball rolling into the road – children will follow it! Also, drive at a speed in which you can stop safely in the distance you can see to be clear.

Skids

Skids are caused by the driver asking too much of the car for the amount of grip that the tyres have on the road at that time. A skid happens when you change speed or direction so suddenly that your tyres can’t keep their grip on the road. Slippery surfaces also increase the risk of skidding.

Skidding is usually caused by the driver braking, accelerating or steering too harshly or driving too fast for the road conditions. If skidding occurs, remove the cause by releasing the brake pedal fully, or easing off the accelerator. Turn the steering wheel in the direction of the skid. For example, if the rear of the vehicle skids to the right, steer immediately to the right to recover.


Anti Lock Braking Systems (ABS)

ABS has been compulsory on new cars since 2004. If ABS is fitted, it will activate automatically if you need to press the brakes firmly or stop in an emergency. It prevents the wheels from locking so that you can continue to steer the vehicle while braking. ABS works by locking and unlocking the wheels many times a second, to allow you to steer. If your wheels were to stay locked, you wouldn’t be able to steer around the obstacle that you are trying to avoid.

ABS doesn’t necessarily reduce your stopping distance, but remember to keep your foot firmly on the foot brake. Some older cars need ‘cadence braking’ where you pump the foot brake – however, this actually reduces the effectiveness of the ABS system. ABS is only a driver aid, it does not remove the need for good driving practices such as anticipating events and assessing the road conditions.

Posted on

M is for Mini Roundabout

Mini Roundabouts are the white circles painted on the road.

They follow the same rules as normal roundabouts: give way to traffic on your right.

Mini roundabouts are often found where there used to be a T-junction. Replacing T-junctions with mini-roundabouts serves three purposes:

  • To improve traffic flow by giving each direction an equal chance to proceed.
  • To slow traffic down in residential/school areas as a form or traffic calming.
  • To confuse learners.

The reason for the confusion is because mini roundabouts are small, and everybody seems to be “on top of each other”. Stick to the rules: if you have priority then take it but proceed with caution in case the next driver is also confused.

Identifying a mini-roundabout.

Mini roundabouts can be identified by a blue sign with three white arrows. Strictly speaking, this means you must proceed clockwise. The need to give way to the right is indicated by a single dashed line on the road at the entrance to the roundabout. You may also see a triangular warning sign; but not always, so always keep alert.

Go around the roundabout (round and around)

The Highway Code states that All vehicles MUST pass round the central markings except large vehicles which are physically incapable of doing so. Remember, there is less space to manoeuvre and less time to signal. Avoid making U-turns at miniroundabouts. Beware of others doing this.

This does not mean making an effort to go around as best you can: it means you must go around, and if doing so requires you to slow down to a handful of miles per hour in first gear then do so. After all, one of the purposes of a mini-roundabout listed above is traffic calming.

Because you will be doing lots of steering in a short space of time signaling on approach and on exit may not be practical. It is quite acceptable to signal your intention on approach and then omit the exit signal.

Making a U-turn at a mini-roundabout is not illegal but it is often impractical unless your vehicle is very small and the roundabout is large. The Highway Code discourages it, although you should be aware that any vehicle signaling right might be about to double-back on itself.


Who goes first?

I am not sure about […] mini roundabouts, most of the time, around here, it just adds to the confusion. I just work on the cars speed, position and eye contact if possible with a side serving of common sense.

Anon

Because mini-roundabouts are small, and other vehicles are quite close to you, it is easy for new learners to get a little confused at who has priority. The rule is the same for any other roundabout: give way to traffic already on the roundabout and traffic on your right but let’s use some diagrams to demonstrate the possible situations.

I encourage my learners to approach a mini roundabout with their index finger on the right hand raised, and for them to say out loud, “you go“. Then for them to swap hands and raise their left index finger and say, “you stay“.


In the diagram above, the yellow car must be prepared to give way to the red and blue cars, as they are to the right. However, look carefully at the direction signals are cars A and B; they will not actually cross your path and so you could proceed with caution. Note also that we have a stalemate situation with each car giving way to the right in an endless loop. In this scenario, somebody has to go first, and it may as well be you … proceed with caution and be prepared to stop if other vehicles begin to move. The main rule for surviving a mini-roundabout is expecting others to be as confused as you are, and be nice to each other.


At a three-way mini-roundabout, the layout may resemble a T-shape, and this is often where the confusion is greater, especially as it will appear different depending on your approach direction.

With the T-to the right, Cars A and B technically have priority, however, if U-turns should be avoided then car A is unlikely to cross your path and you could proceed with caution. You may then find that car A gives way to you because you are on their right! If car B is signaling right then it is likely to cross your path: if it is signaling left then you could proceed with caution. Be nice to each other and be prepared to give up any priority you might have.


With the T going both left and right, Car B has priority over the yellow car, although if it is signaling left then it will not cross your path and you could proceed with caution. Car A should give you priority if you are turning right.


Explaining this one is up to you. Put your answer in the comments. Remember the key principle of giving way to the right and being nice to everyone!

Posted on

Z is for Zebra Crosing

And we may find a tiger too…

Zebra Crossings are low-maintenance, cheap to install, and are simple to use for able-bodied pedestrians. Quite simply, if a pedestrian steps on to a zeba crossing, any vehicles on the road MUST stop and allow the pedestrian to cross.

Originally simply called a “pedestrian crossing”, the path for pedestrians was defined by silver studs: these still appear today. After they were ignored by pedestrians and motorists alike, they were made more obvious with belisha beacons and red/white stripes. Altered to black and whte in 1951, the layout is the same today. See how to use a pedestrian crossing 1940’s style here: http://www.nationalarchives.gov.uk/films/1945to1951/filmpage_pc.htm

Clearly, if you are very close a crossing at more than a handful of miles per hour, and a pedestrian decides to go for it, the pedestrian will end up worse off. But the driver will be at fault. Therefore, we need to slow down in anticipation of anybody on the pavement who may be about to cross. As you approach, scan both sides of the crossing for pedestrians either waiting to cross, or nearby the crossing who may need to cross by the time you arive.

If you cannot see both sides of the crossing then slow down until you can. Other vehicles, trees, and bends in the road can all obscure your view. By slowing in advance the likelihood of timing it right and not needing to stop completely is quite high. You can improve pedestrian safety by leaving the space beyond the crossing clear (1-2 car lengths is enough); this makes it easier for drivers in the opposite direction to see pedestrians on your side of the crossing. Now if only everyone did that!

You can usually see zebra crossings from a good distance by the flashing orange “Belisha Beacons”; and there is often a warning sign for a zebra crossing ahead if visibility isnt perfect. (For the geeks the belisha beacon is covered by BS8442, and the flash rate is 750ms on, 750ms off).

Two-part zebra

A zebra crossing with a central island for pedestrians should be treated as two separate crossings. In this example the traffic travelling left to right must stop for the pedestrian: vehicles travelling right to left may continue. But think … how long will it take the pedestrian to reach the central point? If you are more than a few car lengths away then you’ll probably need to stop (or better, slow) anway.

Slow and go

Ideally, you’ll plan ahead and use your anticiaption skills to prevent the need to come to a full stop. But certain pedestrians e.g. elderly, blind etc may take a long time to cross, and coming to a complete stop provides them with some reassurance that they will be safe.

Zigzags

The zigzags serve two purposes: they indicate the place near the crossing where you must not park (this would make it difficult to see pedestrians). They also indicate a no-overtaking zone: you must not attempt to overtake the vehicle nearest to the crossing. It does not matter if the lead vehicle is moving or stopped to allow pedestrians across: do not overtake it.

Tiger Crossings

Cyclists should not cycle across zebra crossings but they do, and their approach speed and ability to “appear from nowhere” makes them an additonal hazard to look for. A recent invention is the Tiger Crossing, which specifically allows cyclists to cycle across (think of it as the equivalent of a Toucan Crossing). Anywhere you see cycle paths on the pavement, the zebra crossing may have been upgraded to a Tiger. The same hazards of fast approach speed means that you’ll need to be extra cautious when drivng towards this type of crossing

Posted on

D is for Dual Carriageway

A dual carriageway is a road which has a central reservation to separate the carriageways.

They are usually used to link major roads or areas together, and where there is high traffic flow – where two lanes would benefit the traffic to keep traffic moving. Despite the name, some ‘dual carriageways’ have only one lane in each direction, or maybe three lanes: it is the separation between opposite directions that makes it a dual carriageway.

How do you join a dual carriageway?

If there is no slip road, emerge as you would like a left turn at a junction. Ensure that you emerge into the left hand lane of the dual carriageway, and you wait for a gap big enough to build up your speed.

If there is a slip road, indicate your intention to join, and use the slip road to adjust your speed to that of the traffic on the dual carriageway. Look for a gap in the traffic, and then merge into the left hand lane. Consider a quick sideways glance to check that there are no vehicles next to you, but also use your mirrors effectively to see the position of the vehicles on the main dual carriageway.

Once you have joined, remember to cancel your indicators, and continue to build up your speed to match the speed of other vehicles.

If other vehicles are trying to join the dual carriageway whilst you are already on it, follow these tips:

  • Don’t try to race them whilst they’re on the slip road
  • Look well ahead, if there are several vehicles trying to join, be prepared to adjust your speed
  • Show consideration for traffic joining, and if it’s safe to do so, change lanes to give the joining traffic space
  • Take extra care if the dual carriageway curves, as vehicles on the slip road may have difficulty seeing vehicles on the dual carriageway

Whilst on the dual carriageway

Continually reassess the movement of other vehicles, and check your mirrors so you know what’s happening around you. Remember that at high speeds, situations can change rapidly, and effective observations can help you prepare for any sudden developments.

Tips for good, defensive driving on a dual carriageway:

  • Anticipate problems, take avoiding action before they develop
  • Slow down in good time
  • Keep your distance from the vehicle ahead
  • Take particular care when overtaking lorries, as some have poor visibility to their right
  • Avoid braking suddenly. Leave plenty of space between yourself and the vehicle ahead
  • Always check in your mirrors before braking so you’re aware of who’s around you

It is important to leave at least a 2 second gap between you and the vehicle in front. This means if the vehicle ahead suddenly brakes or something happens, you have time to react. In the rain, or when the roads are wet, we should increase this to a 4 second gap. When it’s snowing or icy, we should times this by 10, and leave a 20 second gap.

Lane discipline

Where we have two lanes, the correct position for normal driving is in the left hand lane. The right hand lane is for overtaking. Once you’ve overtaken, you should return to the left hand lane when safe to do so. Large goods vehicles (such as lorries etc) are permitted to use both lanes, and are to follow the same rules.

Where we have three lanes on a dual carriageway, the same rules apply – keep to the left hand lane unless overtaking. However, don’t stay in lane number 2 or 3 for longer than necessary, or if you’re delaying traffic behind you. Drivers of large goods vehicles (lorries etc) or those towing trailers, are not permitted to use the far right hand lane of a 3 or more lane dual carriageway, unless the other lanes are closed.

Overtaking safely

You shouldn’t change lanes unnecessarily. The Driving Essential Skills book (our ‘bible’ of driving safely and effectively) says that we should use the Mirror-Signal-Position-Speed-Look routine. At higher speeds you would need to start this routine earlier.

Mirrors – check your middle and right mirrors to check the vehicles around you – look at their position and speed. Consider a glance to your right to check there are no vehicles directly next to you (which you would not be able to see in your mirrors). Remember that vehicles may be travelling faster than you in the right hand lane – take this into account when overtaking and changing lanes

Signal – Signal in good time. The sooner you indicate, the sooner other drivers are warned of your intentions, and they’ll have time prepare and plan

Position – You should be able to move out into the overtaking lane smoothly. Avoid making sudden movements.

Speed – Make sure you’re going fast enough or can accelerate quickly enough to overtake without blocking any vehicles coming up behind you.

Look – Look ahead and use your mirrors to check whether there’s anything preventing you from overtaking safely (for example, a lane closure up ahead, or traffic approaching much faster from behind)

Be particularly aware of motorcyclists who may be harder to see. Also in heavy traffic, be aware of motorcyclists filtering through lanes of slower moving traffic.

When moving back to the left, use your mirrors to ensure you have fully passed the vehicle that you’re overtaking. Signal if necessary, before moving back to the left as soon as it’s safe to do so.

You should never overtake on the left, unless the traffic is moving in queues and the queue to your right is moving more slowly than the queue you’re in.

How do you leave a dual carriageway?

Know which exit you want to take by looking at road signs or listening to your sat nav. Position yourself in the left hand lane in good time. Make sure you plan well ahead, and aren’t stuck in a far right hand lane when you should be coming off the dual carriageway. Look for the countdown markers that tell you how far it is to the exit – 300, 200, 100 yard markers.

Try to avoid slowing down on the dual carriageway before you exit, as you could hold up vehicles behind you. Try to wait until you are on the exiting slip road before braking. If the slip road is really short, you may need to start braking just before you exit to bring your speed down.

If you miss your exit, carry on to the next one.

Remember that you will be used to driving at high speeds whilst on a dual carriageway. When you exit a dual carriageway, your judgement may be affected. Going 40mph may feel like 20mph. Glance at your speedometer to check your actual speed.

Breakdowns on dual carriageways

Some, not all, dual carriageways have a hard shoulder, and sometimes they also have emergency phones at regular intervals. Most dual carriageways however, do not have a hard shoulder or an emergency phone. If you breakdown, you should try and get your car off the main dual carriageway if possible – whether this is driving to the next exit, pulling onto a grass verge, or using a lay by or hard shoulder.

Use laybys where possible, and use an SOS phone if available to call for help

You should also

  • Use hazard warning lights
  • Place a warning triangle at least 45 metres/147ft from your vehicle if safe to do so (not on motorways).
  • Move your passengers to a safe position, preferably behind a safety barrier behind your vehicle. Ensure passengers are well away from other vehicles driving on the dual carriageway. Do not leave passengers in the vehicle – if your vehicle gets hit whilst stationary, this could do alot of damage with your passengers inside.
  • Telephone for assistance (using either your mobile phone, or the SOS phones if available. Using the SOS phones will allow the operator to find your exact location)
  • Keep animals in the vehicle (in case they run across the dual carriageway, causing more hazards or even a collision)

Speed limits on dual carriageways

The national speed limit for a dual carriageway is 70mph. If you are a large goods vehicle (lorries, coaches etc) or towing a trailer, you must abide by the reduced speed limit of 60mph for safety reasons. The national speed limit sign is shown here. The lower limit of 60mph also applies to vans.

If any other speed limit applies, such as reduced speed limits for roadworks, for safety reasons on potentially dangerous sections or accident black spots on dual carriageways, they will be in red circles, also pictured. You must abide by the reduced speed limit if shown. You may go back to 70mph once you pass another national speed limit sign.

Is it always safe to go the speed limit though? Good question…

We need to take various things into account when choosing our speed. This could include thinking about traffic conditions, road conditions and quality, your vehicle condition, weather conditions, your health (any medications or tiredness that may affect your driving) etc. Speed limits are limits – not targets. We will be covering this in another blog soon, look out for this!

Reflective studs

Reflective studs are the cats eyes you get in the road. They help you judge where you are on the road, especially at night.

On the far left hand side, you will find red studs. This indicates the edge of the carriageway.

At entrances/exits/slip roads/laybys, you will find green studs.

In between lanes, you will find white studs.

On the far right hand side, between the dual carriageway and the central reservation, you will find amber studs.

We hope this has been helpful!

Next week, we’re looking at… the emergency stop!

Posted on

N is for News (21st August 2019)

Help me! What do we do?’: Learner driver left too scared to move after almost being hit by car fleeing police

Most of us recall our first few driving lessons being an anxious time, remembering to clutch in and shift gears and come off the accelerator seeming the most complex task at first.


Thousands of Brits unknowingly use unlicensed driving instructors – how to spot a dodgy on-road teacher


Plane makes emergency landing on road in Croatia

The pilot of the single-engine Cessna 150 said he had a choice either to land in a field or on the road after the engine malfunctioned.


New rubber road being trialled on the M1 motorway

A new road surface using recycled tyres is being trialled on the M1 motorway by Highways England. A section of road between junctions 23 to 22 on the southbound carriageway of the M1 near Leicester has been laid with the new surface which has been developed by Tarmac.


How you can avid being the victim of road rage

Almost half of British drivers said they have been a vctim in a road rage incident


Woman admits to allowing someone else to take her driiving test

A WOMAN has been ordered to carry out 220 hours unpaid work as part of a community sentence for allowing someone else to take her driving theory test in Skipton.

Posted on

C is for Country Lanes

Country roads are also known as back roads, or rural roads! You may find that country roads are of lesser quality – due to farming machinery and lorries who use them – and often the councils do not prioritise country roads to be maintained, as they prioritise ‘main roads’ where the majority of traffic travels.

Country roads are often narrow, have more bends, less signage, and poor quality road markings – again due to not being maintained as a priority. You may also find that country roads are in complete darkness at night time – they often do not have street lights, making it harder to negotiate bends and other hazards safely.

Road markings and signs

Be aware that due to the country roads not being a priority for maintenance, there may be signs missing or damaged, and road markings that are very faded, so much so that you can’t see them. Be aware if you are approaching junctions where there are no road markings – technically no-one would have priority. Approach such junctions with caution and proceed carefully. Always be alert and aware of your surroundings.

Hidden junctions

You may encounter hidden junctions and junctions on bends. Be cautious when approaching bends – you don’t always know what’s around the corner! Junctions on bends may be well hidden and may not always have warning signs – so be aware of emerging vehicles, especially large vehicles such as tractors.

Large vehicles

You may come face to face with tractors or lorries – lorries may be delivering to local farms, or taking produce from the farm to supermarkets. Tractors and other heavy farming machinery will be out and about, especially during the summer months when they harvest their crops. Be aware of what’s around you when you see a tractor or lorry approaching you – take into consideration that they may need more room and may take up more space. Be prepared to slow down, move over if the road space allows you to, and even be prepared to stop if necessary.

Animals

You may also come across wildlife – such as dears, cows, sheep etc.

Horse riders may also be out and about.

The Highway Code, Rule 214 says – When passing animals, drive slowly. Give them plenty of room and be ready to stop. Do not scare animals by sounding your horn, revving your engine or accelerating rapidly once you have passed them. Look out for animals being led, driven or ridden on the road and take extra care. Keep your speed down at bends and on narrow country roads. If a road is blocked by a herd of animals, stop and switch off your engine until they have left the road. Watch out for animals on unfenced roads.

Cyclists and pedestrians

Always look out for cyclists, and pedestrians who may be walking or running. Cyclists and pedestrians may be alone, but may also be in groups. Again, be prepared to slow down, give plenty of room (at least 1.5 metres), and be aware that cyclists especially may suddenly swerve to avoid potholes, or may be blown by the wind into your path. Country roads rarely have paths, therefore you can fully expect to find pedestrians in the road. Pedestrians should always walk facing the traffic – for example, walking towards you on your side of the road. This is so that the pedestrian can see what is coming towards them and take action if needed (such as moving out of the way for heavy farming machinery or a lorry).

What’s the speed limit?

The speed limit for most country roads is 60mph. However, we should always take into consideration our surroundings and other factors. The speed we choose to go could be influenced by one or more of the following –

  • Your vehicle condition – is your vehicle in excellent condition, with the brakes in good working order, has your car been serviced recently?
  • The road condition – look out for dips, bumps, pot holes, the road cracking, etc. Watch out for mud or straw in the road, left behind from farming machinery or lorries etc.
  • The weather – be aware of rain (whether it’s light or heavy!), storms, strong winds, snow, ice, fog. All of these could make the conditions more difficult to drive in. They could make the road surface slippery, and make visibility more difficult
  • Who’s around you look out for pedestrians, cyclists, animals etc, especially when approaching bends where you can’t see clearly around the bend
  • The time of day – be aware that driving in the dark can be more dangerous and reduce your visibility. You may also be more tired at night. Equally, be cautious when driving in the sun, as this could blind you. Make good use of your sun visor and sunglasses. You may also find that driving in peak times (0700-1000 and 1600-1800), that it may be busier and you may have more traffic and hazards to deal with
  • Your own ability – if you have less experience, you should consider being more cautious and taking your time
  • Your own health at the time – if you are more tired, you should consider being more cautious and pulling over for a break where possible. If you have a headache or are in pain, you should also take this into consideration
  • And many other factors! Can you think of any other factors which may help you decide your speed?

Passing places

Where roads are very narrow, passing places have been made so that you can pull over to allow oncoming traffic past. We should only pull into passing places on the left. The oncoming traffic may be able to pull into one of their passing places first. Be prepared to reverse into a passing place if necessary. You could also wait opposite a passing place, so that the oncoming vehicle can go into that passing place. You should consider the size of the oncoming vehicle, their speed, and their road positioning – does it look like they are going to slow down for you? Are they making an effort to find a passing place to pull into?

Top tips for driving on country roads

  • Belt up – It could make a crucial difference in the event of an accident
  • Watch your speed – Drive at a speed that won’t affect your decision-making ability
  • Prepare for the unexpected – You might know the road like the back of your hand, but the conditions are always changing
  • Reduce your speed on blind bends – You never know what could be around the corner
  • Look out for blind summits and hidden dips – Keep an eye on road signs and slow down as you approach
  • Put away any distractions – Ignore your phone, leave your sat nav alone, and wait until you’ve arrived safely to have that packet of crisps
  • Stay in control – Drive to the conditions and be alert to unexpected hazards

Country roads are statistically more dangerous, with more deaths occurring on these types of roads. In 2017, 992 people were killed on country roads. In 2017, 77 people were killed on a motorway. You can see already, the massive difference in fatalities on country roads, compared to other types of roads. Source: RoSPA

Age of drivers who were killed or seriously injured in accidents on country roads

We’ve included some pictures of some statistics – and they are admittedly scary! More drivers are killed on country roads than any other type of road.

The likely reasons for this are –

  • Speeding
  • Not having proper control over their vehicle
  • Being distracted – possibly by passengers, children, their mates in the car, sat navs, phones, eating or drinking etc
  • Night time – drivers not being able to fully see where they are going
  • Experience – maybe the driver didn’t have the skill to negotiate the country roads, or deal with situations as they arose. Statistically, younger drivers are more likely to be involved in an accident due to their inexperience

Remember – your driving instructor would be more than happy to cover country roads with you again, and even if you’ve passed your driving test, you can still have refresher lessons with your instructor!

We hope this helps and is informative!